cut-out cookies
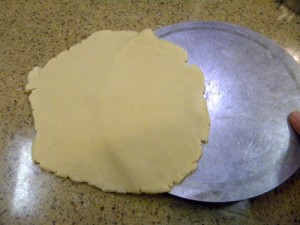
Like most moms, I’ve been making cut-out cookies for years and years, with or without the “help” of my kids. Here’s the annual routine – as I make the dough, they are chomping at the bit to help cut out the cookies while the dough chills. We cut them out together and while the cookies bake, the kids just can’t wait until the cookies are cool enough to frost and decorate. They rush into the kitchen, happy and excited as can be, decorate about 6 cookies each, destroying the kitchen in the process, and then are bored of the process and run off to play while I am stuck decorating the remaining 5 dozen cookies and cleaning up sprinkles from every corner of the kitchen for months to come. Sound familiar!?! It’s a wonder I ever decided to teach kids to cook after this yearly event. The other problem I used to have with cut-out sugar cookies is that they would spread out on the pan while baking, losing much of their original shape. It was often hard to tell a Santa from a snowman! After research, trial, and error, I finally came up with two solutions. First, instead of using flour to dust on the work surface and the top of the dough, use granulated sugar. All that flour that gets incorporated into the dough when rolling and re-rolling throws off the composition of the dough and causes it to spread. Next, chill the cut-out cookies before baking to firm up the butter in the dough – problem solved. Now Santa looks like Santa and a star actually has defined points at its ends. Another tip; if your circle of dough is too large to loosen from the counter with a pastry scraper (also called a bench knife), the bottom of a tart pan does a wonderful job of getting to the center of the dough to get it unstuck from the counter.

Thanksgiving Turkey and Pilgrim Hat
Cut-Out Sugar Cookies
3 cups flour
1 teaspoon baking powder
1/2 teaspoon salt
1 cup (2 sticks) unsalted butter, room temperature
1 cup sugar
1 large egg
2 tablespoons sour cream
1 teaspoon vanilla extract
Additional sugar for rolling dough
Icing
6 cups powdered sugar
1/4 cup milk
1/2 teaspoon vanilla extract
Food coloring
Colored sugar crystals, sprinkles, and other candy décor
Sugar Cookies: Sift flour, baking powder, and salt into a medium bowl. Using an electric mixer, beat butter and 1 cup sugar in a large bowl until creamed together. Add egg, sour cream, and vanilla; beat for 1 minute. Add in flour mixture in 2 additions until just blended. Gather dough together; divide in half. Flatten each half into a disk; wrap in plastic and chill for 1 hour. (Can be made 1 day ahead. Keep chilled. Soften dough slightly at room temperature before rolling out.)
tools of the trade; Silpat mat, French rolling pin, pastry scraper, and tart pan bottom
Line 2 baking sheets with Silpat mats or parchment paper. Sprinkle the work surface and top of the dough with additional sugar. Working with 1 disk at a time, roll out dough to 1/4-inch thickness.

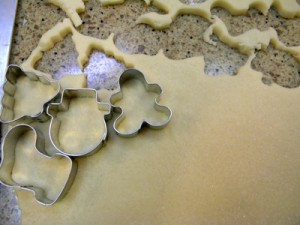
position the cutters tight together so you have fewer scraps to re-roll
Using cookie cutters of your choice, cut out cookies. Transfer to baking sheets, spacing 1 inch apart. Gather scraps and roll out on a sugared surface; cut out more cookies. Repeat until all dough is used. Chill all cookies on baking sheets for at least 15 minutes before baking to firm up the dough.
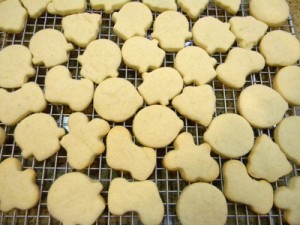
Preheat the oven to 350 degrees. Bake cookies, 1 sheet at a time, until lightly golden at the edges, about 12 minutes. Transfer cookies to racks and cool completely.

cooling on racks, ready to ice and decorate!
Icing: Combine powdered sugar, milk, and vanilla in a medium bowl. Stir until icing is smooth and spreadable, adding more milk by teaspoonfuls if too thick or more sugar by tablespoonfuls if too thin.
Divide icing into as many separate bowls as you want to have colors of icing. Mix a few drops of the desired color into each bowl and mix to completely blend.
Using a small icing spatula, or table knife, spread a thin layer of icing atop each cookie. Alternately, use a pastry bag to apply the icing around the edges of each cookie and spread icing in the center. Ice cookies only 1 or 2 at a time and quickly decorate cookies with colored sugar crystals, sprinkles, or any other candy décor before icing sets.
(Can be made several weeks ahead and frozen or 3 days ahead if left at room temperature. Store in airtight containers between sheets of waxed or parchment paper.)
Makes dozens of cookies, the exact quantity depends on the size of the cookie cutters


4 comments
Bring us down cookies!
No can do! But when you come up for Thanksgiving and Christmas… cookies!
Every year I say I am going to start my christmas baking early….this year I really will:) and I will be using this recipe. Thanks Linda!
I know, Denise, I am the same way… cooking classes are forcing me to do it this year, a very good thing indeed!
Leave a Comment