don’t throw out hard brown sugar
With holiday baking in full swing, I wanted to share a tip with you that I’ve used for years, more times than I’d like to admit.
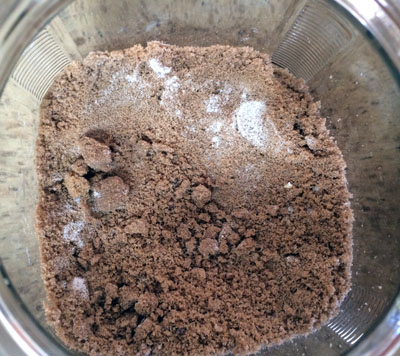
Don’t you hate it when you open your container of brown sugar, only to find a rock-hard, impenetrable, tough-as-nails substance? Yeah, see those white patches in my sugar above? That’s where I could barely scratch the surface with the metal measuring cup.
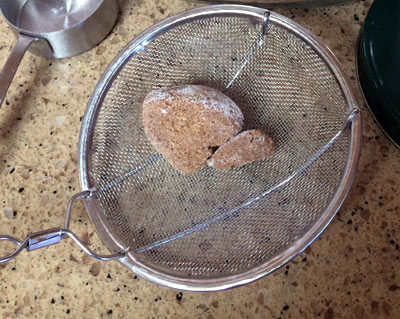
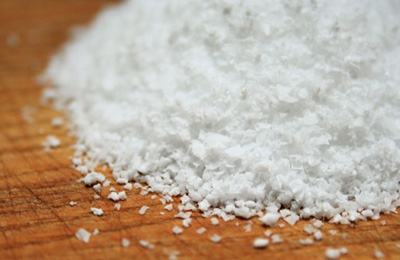
I was able to chisel out a chunk. I then “grated” the sugar rock with a strainer into the bottom of the baking dish for THIS recipe. If I would have needed the brown sugar to be mixed with other ingredients, as it is in chocolate chip cookies, I would have called my sweet neighbor, “Gladys,” asking to borrow sugar.
How many times has this happened to you?
If you’re a non-baker like me, more often than you would like to recall. What do you do when it occurs?
Begrudgingly, jump in the car and head to the grocery store?
Call a Gladys to “borrow” sugar?
Throw the brown rock sugar away?
Well, No More!
If you’re in a real pinch and are at mid-point in your recipe, you still may want to call Gladys. But you’ll be able to pay her back a few hours later when you’ve revived the rock sugar in that container.
Here is the trick that works.
Every! Time!


November 19, 2013 10 Comments
salting beef
When I have the time, I like to salt my beef and let it sit at room temperature for 1 hour before cooking. If I have even more time (and remember – that’s really the hard part – remembering!) I prefer to salt it overnight.
You may have heard or been taught to not salt beef until just before cooking. That can be true too. I know, it’s so contradictory and confusing. Instead of trying to explain it myself, I am going to direct you to THIS ARTICLE, which explains the science of it perfectly, and also tells you what NOT to do when salting beef.
This is good information, don’t be lazy, be sure to check it out!
March 16, 2013 No Comments
dinner party main course

This is the final recipe from our dinner party with Karen and Bob. As with the other recipes, I found this in a food magazine, this time from the February issue of Food & Wine.
The changes I made; two large onions seemed like too much, so I decreased it to one. The recipe was called Ratatouille Toasts with Fried Eggs, it is now Ratatouille Toasts with Poached Eggs. Poached eggs are easier and able to be done ahead, a huge bonus when entertaining.
To do so; poach your eggs as normal, but under-cook them slightly. About 30 seconds off of your normal cooking time should do the trick. Just make sure the whites are nearly set. Lift the eggs directly out of the simmering water and into an ice bath to stop the cooking. Then place them into the refrigerator until you need them.
When you’re ready to serve, bring a pot of water to a gentle simmer and give your eggs a final 45 seconds of poaching. Because the whites are already set, you can heat several eggs at once without worrying that they will stick together. This takes much less time than poaching all the eggs at the last minute.
I usually poach the eggs the night before or the morning of a dinner or brunch. In the recipe below, I have instructions as if you are going to serve the eggs immediately, just in case that is how you would prefer to do it. Use the instructions above for making ahead.
January 25, 2013 1 Comment
slow cooker tip
Today, I have more of a tip for you than a recipe. It all came about because of a mispurchase that I made at Costco some time ago.
Mispurchase ~ spell-check does not like that, but I think it is a perfectly reasonable word.
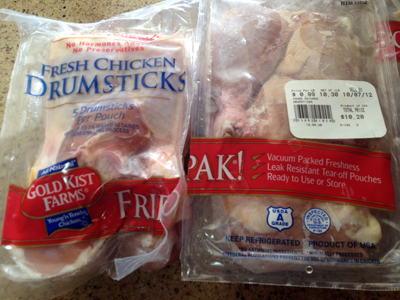
Anyhow, I accidentally bought a huge package of chicken legs instead of chicken thighs, and the legs have been sitting in my freezer for much too long.
Connor is still home this week, so I decided that he would absolutely love to have chicken legs for dinner and for a few lunches before he goes back to school on Monday.
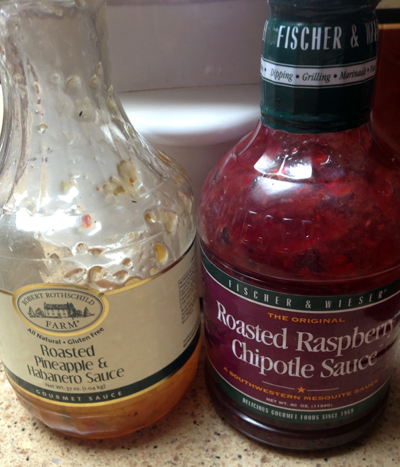
I also had way too many bottles of various sauces taking up room in my refrigerator. I used a mix of these two.
So what does all this have to do with a new tip for a crock-pot/slow cooker?
Being as lazy as can be, I didn’t want to brown the legs before sticking them in the slow cooker and I didn’t want to have to pull the skin off of all 15 of them. But I also didn’t want all that fat from the skin to be floating around in there. So… I came up with for brilliant idea of wadding up some foil and placing it in the bottom. Worked like a charm!
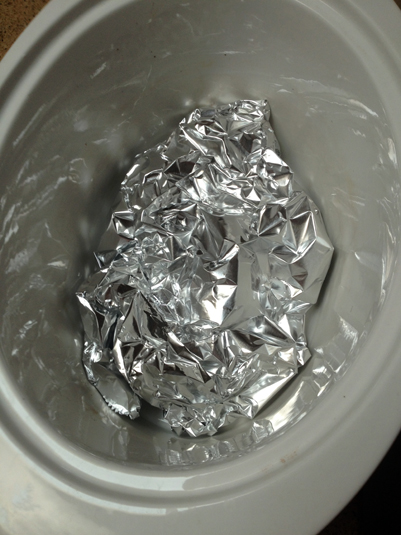
The fat all went down below the foil and the legs turned out crispy and cooked through and through.
January 11, 2013 4 Comments
nearly back to normal
As of 4:30 PM yesterday, my house is nearly back to normal. With a boat-load of help from Connor, Christmas is packed up and put back in the crawl space.
I still need to clean up my sitting room, which served as “the wrapping station” this year. Since I was using a walker during the time I was wrapping, it looks as though a bomb went off in that area. I’ll get that cleaned up today and all the regular “decor” put back into place. Then I am done!
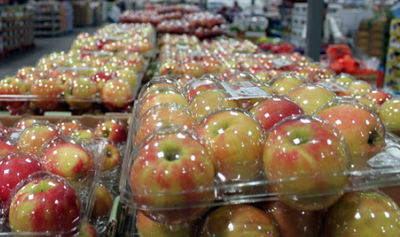
So what’s with that photo above, taken of stacks of apples at Costco, you ask?
You see, my husband, David, eats an apple every single morning. Seriously! Every. Day. He rarely gets sick, so I suppose it is true, that an apple a day does keep the doctor away.
Costco sells apples in these wonderful little domed containers. Back in October, I began to save them with the thought that they would be perfect to hold and store Christmas ornaments.
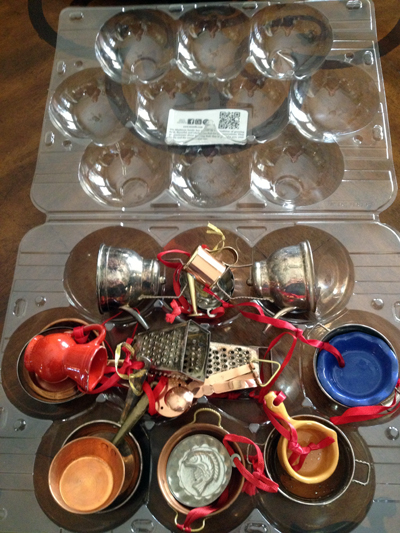
They are perfect!

The space between every two apple rounds doesn’t come up completely, so you can even place long ornaments there and take up two spaces.
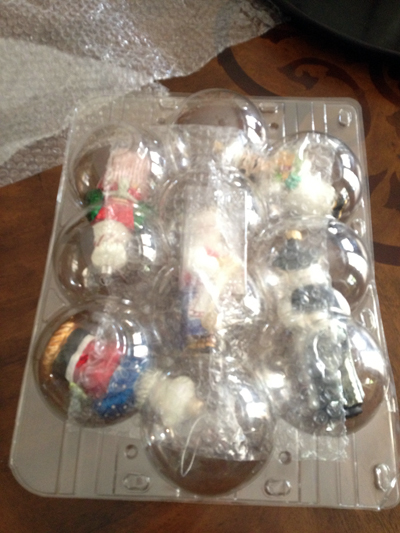
Next, I placed a sheet of bubble wrap on top to prevent items from slipping and jiggling. Then I just closed and sealed the lid, and everything is safe and sound.

Turns out, the container is perfect for my delicate bottle brush trees too. No crushed or damaged trees to deal with next year!
January 8, 2013 7 Comments
open says me

When one of my two brilliant children was young, he or she thought that when someone said, “Open Sesame” they were saying, “Open Says Me.” I won’t reveal which one of them it was, but how cute is that?!
Open Sesame is the magical phrase in the story of “Ali Baba and the Forty Thieves” and it opens the mouth of a cave in which forty thieves have hidden treasure.
This asparagus recipe is magical and your brain will be telling your mouth, “Open Says Me” when you make it!
This was one of the recipes this past Wednesday night at the first of my 3-week series of classes at Les Gourmettes. That’s why you’ll see a photo of several plates lined up. They were still awaiting the chicken and polenta… a recipe I’ll post in a day or so. The asparagus and accompanying mayo were a big hit. And… it’s “easy breezy” to boot!
November 17, 2012 3 Comments
Auntie B’s cake

Today is Dave’s birthday. Connor came home from school for the weekend and HE, not I, made Dave’s birthday cake! All I did was take the action photos. Dave’s cake of choice is always his Auntie B’s Chocolate Cake. My mother-in-law sent me the recipe even before we were married so that I could make it for her boy who had moved so far from home.

Dave remembers the anticipation of The Beloved Cake when he would see a measuring cup full of milk, covered with a towel, sitting near the heater under the front picture window of his childhood home. You see, the recipe calls for sour milk. That old method of souring milk is no longer recommended since milk that is soured naturally may contain toxins. A safer, quicker, and much easier way to sour milk is to add 1 teaspoon of lemon juice or white vinegar to 1 cup of 2% or whole milk and leave it to sit on a counter for 15 minutes before using. All that being said, everyone in Dave’s family is healthy and happy after consuming many of Auntie B’s cakes that were made with naturally soured milk.
Happy Birthday, Dave! xoxo
October 6, 2012 5 Comments
silly Shirley
Ten days ago today, was my 3rd Blogiversary and I put up my 1000th post. On that momentous day, I included this picture.

Yesterday, I found this picture of a painting by artist Sarah Ashley Longshore, on Facebook…
August 26, 2012 1 Comment
pop pop

This is the final entry of my quick and easy party food ideas for the week… and it may be the easiest of them all. Only four ingredients take only minutes to assemble and bake.
Get the kids to help and put them together, assembly-line style, and you’ll be chowing down on these puppies in less than 20 minutes.
Tip: I always keep cooked bacon pieces in my freezer. Anytime a recipe calls for bacon that is chopped and cooked crisp, I will cook up a full pound, use what I need, and place the rest in a freezer ziplock bag. Then when you need a small amount, such as for these poppers, you just pull out what is needed. Perfect for a quick omelet any morning of the week too.
July 18, 2012 2 Comments
table setting

Every week of summer cooking classes we take time out of the kitchen and gather around the table in the dining room to learn how to set a proper table.
Each student is given a Dinner plate, Salad fork, Meat fork, Dessert fork, Dessert spoon, Meat knife, Soup spoon, Bread plate, kitchen towels, and Water glass (actually it holds lemonade each day).

Sometimes one or two students (usually returning from a couple of weeks earlier or sometimes as long ago as last summer) get it perfect as shown above.
I use this mnemonic to help the kids remember how to set a proper table: The word “Right” has five letters, as do the words “spoon” “glass” and “knife”. So remember that the spoons, glasses, and knives all go on the right of the plate.
Likewise, the word “Left” has four letters, as does the word “fork”. Therefore forks go on the left of the plate.

To help remember which way the dessert fork and spoon face, just place them on the sides of the plate they naturally go on (spoon with 5 letters on the right and fork with four letters on the left) and slide them from there to up above the plate and they are naturally facing the way they belong.

Finally, if you have trouble remembering which bread plate and which drinking glass are yours at a crowded table, just do this: Make a lower case “b” with your left hand and a lower case “d” with your right hand. Hold them up in front of you. Your bread plate “b” is on your left. Your drink “d” is on your right.
June 27, 2012 8 Comments